
So you’ve bought or rented your first home and you have a list of home renovation projects that need to get done. They seemed to be easy enough when you made the list, but now it’s time to get started and that list is looking more and more daunting.
Where do you start?
How do you know when you’re finished with a project?
And how many times will you have to go back to the hardware store?
Maybe you’ve tried a home renovation project before and it didn’t go as planned. Or maybe you’re stuck in the planning stages and can’t quite get started. Home renovation isn’t easy, but it doesn’t have to be hard.
Like with anything in life, it takes time and practice.
But don’t worry, these five tips below can help make your home renovation projects go smoothly!

1. Start with a plan
Some of my most frustrating home renovation projects have been started by going to the store and buying something that I thought would be a fun project. Like those peg wall boards I bought at Ikea one time and thought I’d organize my entire garage.
Take some time to think about how you’ll execute the project you thought of this morning. Research how other people have done it, write down the supplies you’ll need, and make a realistic timeline of when you want to get it done. Realistic is the most important word for a timeline; think about what you have going on and how much time you’ll actually be able to commit to a project.
My fiancé loves to give me a hard time about my poor time management skills. I tell him that I’m just overeager and want to get a lot done. When I’m excited about something I want it done now, but that can’t always happen with life getting in the way.
It’s best to take a look at your schedule and plan out home renovation projects by how long they’ll take and how much time you have to dedicate to them. This will cut down on frustration when a project takes longer than you thought it would.
2. Don’t reinvent the wheel
I’ll admit that I hate that corporate phrase, but it really is true. I mentioned it in the previous tip, but look at how others have completed the same project you want to do.
Watch videos if you’re a visual learner or read about them if that’s your thing. Just make sure that someway, you’re learning from other people to help your home renovation project go smoother.
Many people will happily share the mistakes they made and how to avoid them. This helps to avoid problems before they even start in your home renovation project! You can also get inspiration for your own projects if you don’t have it completely mapped out yet.
3. Start small and work your way up
As I said earlier, it takes time to improve at something. Don’t make an entire kitchen makeover your first home renovation project if you have no experience.
Start small with something like a paint refresh in a bedroom, or a living decor makeover, and work your way up. Maybe you change out a light fixture next, then add new flooring to a room.
These easier projects also give you instant gratification – seeing a room with an entirely new color makes it feel like a new space. And makes you feel good about the work that you did! Larger projects take more time and the results are more difficult to see.
Get your feet wet with smaller projects and slowly start to build your home renovation skills.
4. Don’t do it alone
Chances are, you have some friends who have some home renovation experience. Or at the very least, some friends who are willing to help you out with projects.
Two minds really are better than one, as are an extra set of hands. Home renovation projects are a lot easier when there are other people to help, even if you think it’s not necessary. It’s nice to have someone to bounce ideas off of, or offer an idea when you feel stuck.
It’s also fun to have more people around when you’re doing hard work! Offer your friends a free meal in exchange for help and I bet you’ll have willing volunteers.
5. Get quality tools
Having the right tools for home renovation projects is essential. You wouldn’t start running as a new hobby with sandals, so treat your projects with the same care.
Quality tools don’t have to break the bank – try to get a few tools that will help you with multiple projects (this is also where planning comes in handy!). There are also many sales throughout the year, so do some pricing research before buying.
I like to purchase electric tools, so I try and buy the same brand so I can use the one battery for different tools. This helps cut down on battery costs and helps projects run smoothly, so I always have a charged tool.
–
You’ll be a home renovation project pro in no time with these tips! It doesn’t have to be hard, and hopefully, these tips make your projects feel less daunting. Let me know what projects you’re getting up to in the comments, or tag me on Instagram or Twitter!


Tie dye has been really popular lately, and recently I saw a tie dye duvet cover for sale but thought I could make one without spending a pretty penny. I’ve never tried shibori tie dye before but the duvet cover turned out really well! If you’d like to watch the video of the whole process below:
Overall the project was pretty cheap – you just need a plain white duvet cover, fabric dye, and a dye “setter.” Technically, you don’t need to set the dye, but I knew I’d be washing it regularly and want the dye to stay vibrant for as long as possible.
Shibori is different from other regular tie dye because the folds create the pattern – I did a triangle pattern for the pillowcases and a square pattern for the duvet cover. There are so many different ways you can fold the fabric, and you can also try to make your own!
How to fold the duvet cover

I started out by laying the duvet cover on the ground to do the folds (and my dog Luna decided to help). I suggest getting another person to help you so the folds are even, but it can be done alone if you take it slow! Just try to keep them consistent as you fold.
The folds will be accordion style – over and under. Keep doing this until you have one long strip of fabric.

Once the duvet cover is folded into a long strip, start folding it over and under again. This time you’ll be making little squares.


After you have a giant square, tie some twine around it to hold it in place, or use large rubber bands if you have them.
You can fold the pillowcases the same way, or do triangles instead of squares. I decided to do triangles so the pillowcases are a little different than the tie dye duvet cover. The differing patterns look really cool once it’s finished!
Mixing the dye

Follow the instructions for the fabric dye you bought. Mine said to add in salt and dish soap to the water, so I put those in the water before adding the dye.
I mixed everything together in my sink because I don’t have a large enough bucket to fit all the water in, but if you do, feel free to forgo the sink! This did not end up staining my stainless steel sink.

Mix everything together really well, and if you want to check the color you can use a paper towel to do a quick test of how it’ll look!
How to dye the fabric

Once the water is mixed, slowly add in the duvet cover and pillowcases. You might have to hold them under the water until the fabric is saturated and doesn’t float to the top. Go slowly!
Also try and give each piece enough space so that they aren’t touching one another. I let the fabric sit in the dye for about an hour and stirred them around halfway through.

Once the fabric has sat in the sink for around an hour, or the recommended time for your dye, give it a good rinse in cold water. From there, you can either wash the fabric or use a dye fixative to ensure the dye doesn’t fade.

I didn’t have to add anything into the water for the fixative – just the solution itself. Again, go slowly and make sure the fabric is completely submerged. Stir everything around again about halfway so all pieces get covered.

After I was done with the fixative, I let the duvet cover and pillowcases sit out overnight. Pro tip, if you have any puppy pee pads, these are great to sit the fabric on because they soak up all the excess water. I also use these when I water my plants!
My fabric dye said to let everything sit out until the fabric is dry, but honestly, I think it would’ve started growing mold before all the folds would be able to dry. I let it sit for a day and then decided to wash it since it hadn’t dried that significantly.

Wash everything on the coldest setting possible, and if you’re worried about the dye bleeding out of the fabric, throw a towel in the washer too. I did this just in case, and it caught the excess dye that came off.

Tumble dry on low and put it on your bed!

I love how the pattern came out, and it’s the perfect shade for what I was wanting! Let me know if you end up making a shibori tie dye duvet cover, and make sure to tag me on Instagram!
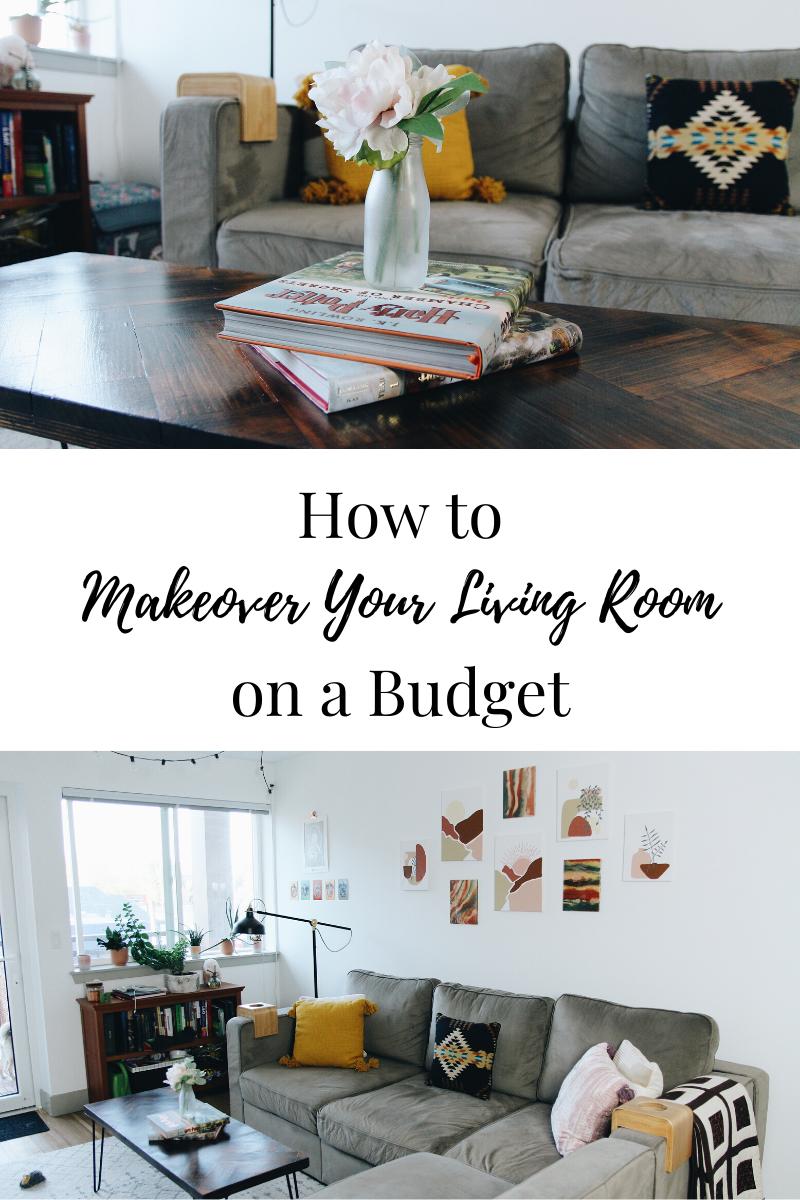
While staring at my walls day after day, I decided it was time for a living room makeover. Our space was feeling boring to me, so it was time for a change. Pinterest has so many great ideas for simple canvas art, and since I have nothing but time, I thought I’d make some new pieces!

Make sure to watch my video below to see how I made the canvases more in depth!
I didn’t want this living room makeover to be expensive, so I mostly used supplies I already had. I had to order some, so I found some deals online (there are a ton right now!) and didn’t spend too much.
It was so relaxing to sit and focus on something other than a screen – my eyes loved the change! Alex was also gracious enough to help me change the decor out, and it helped to have a second eye.
Here’s how I did my living room makeover.
Make your own art

The easiest way to keep your living room makeover cheap is to make your own art. I had been seeing so many simple pieces all over Pinterest and it’s what inspired me in the first place.
If you aren’t great at art, or don’t enjoy it, these simple pieces are great. They don’t take a lot of effort to look good, they’re easy to customize, and you don’t have to focus too much while painting. I also threw in some resin boards to help tie all the pieces together.
Craft stores usually have canvas sales, and I just used some basic craft acrylic paint so each canvas ended up costing me less than $2. Right now is the perfect time to make some art of your own!
You can also make your own flower wall, or do some canvas embroidery!
Change out your pillows

Pillows are such a simple thing to change out, and it makes such a huge difference. I was surprised with how cheap pillows are right now so definitely search around and you’ll find them! These fit in perfectly with my paints and pulled the warm tones down to the couch, too.
I was worried about the tassels at first with our dog Luna, but so far we’ve been safe! I couldn’t resist this velvet pink tasseled pillow.
If you don’t want to get new pillows, you can also just get some pillow covers, or make them if you want!
Move around your decor

To keep the cost down, I just moved around some decor rather than buying more. You can also use large books on your coffee table for a really effortless look! My illustrated Harry Potter copies don’t get enough love, so I gave them a new life on our coffee table.
Try switching living room decor with bedroom decor to freshen everything up, or put some decor away for a more simple look!
Let me know if you end up using any of these tips! I’d love to see how you’re changing up your space during this extra time at home.
Thanks for reading!

Spending your birthday at home has become somewhat of a meme for the spring since we can’t go outside. Don’t let that stop you from having fun, though! I celebrated my birthday at home earlier this month, and it ended up being one of my favorites so far.

Plan ahead

This is something you likely do when you’re able to have your birthday outside with friends, but make sure you don’t let the day arrive without any idea of what to do! I’ve got some ideas for you below, but make sure to plan for them like usual.
Have FaceTime/Zoom dates with friends

If you’re stuck alone, or at least away from friends for your birthday at home, hang out with them virtually! There are so many ways to connect with loved ones online, and you can even do things like play board games, video games (anyone else obsessed with Animal Crossing?), or have happy hours.
You can spend your birthday at home but also feel like you’re in your friends’ living room. It’s important to reach out to others with all this time alone, so make the time to hang out with other humans!
Have an at home paint and sip night

There are so many fun classes to take in the real world, but few that you can do at home. A paint and sip night is actually really easy to have in your house, and it takes off the pressure of creating a good painting! Alex and I did this for my birthday at home and we had so much fun.
Look online for a video painting tutorial and follow along. Many craft stores are still offering online order and curbside pickup so take advantage of that if you don’t have any supplies. If you plan ahead for this, you can also order them and have them shipped straight to your home.
It’s also fun to have someone choose your DIY supplies and make something you usually wouldn’t have!
Go to a lookout point

A change of scenery can be fun any day, but especially when you spend your birthday at home. It’s great to get out of your space and change your physical and mental point of view.
Chances are these lookouts are a lot less crowded than usual, too! You’ll be able to enjoy the view more than before, and you can do so from the comfort of your car. Take some birthday cake along with you, and you have the perfect date!
Bake your favorite sweet

If you don’t like to bake yourself, you can also request that this be made for you of course! I love to bake but Alex volunteered to make my favorite lemon cake for my birthday and it was so much fun to help him out.
Spending your birthday at home doesn’t mean you shouldn’t enjoy a nice dessert. If you usually go out, it’s fun to change up the pace and make something yourself! Plus, there’s plenty of time right now with all of the at home time.
Have an at home movie night

In the age of streaming services, there are so many movies to choose from. Fix some popcorn, make a pillow/blanket fort, and put on your favorite movie for your birthday at home!
Alex and I go to the movie theaters a lot, so we’ve been trying to still watch movies during the weekend. It’s fun to try and make it feel like the actual theater, so have candies and snacks ready and make a whole night of it.
I hope these suggestions help make your birthday at home a little brighter! It can still be a lot of fun even if you aren’t going outside. You can also use any of these for birthday surprises for loved ones 🙂
I love to work from home, but my space wasn’t the most inspiring. My desk at work is clean, simple, but also decorated just how I like which keeps me focused and motivated throughout the day. Since work from home has become the new norm, I needed to setup my space so I’d get more done!

Clear off your workspace
I tend to spread out as I work, so it’s important for my desk to be clean and free of clutter. The first thing I did was clear through the paperwork and knickknacks. Overall I’ve been trying to do that with all my spaces this past year because I love my little collectables! Now I try to limit myself and I did the same with my desk.

I also write a lot of notes to myself because I’m forgetful, so having a “rule” for myself to keep the desk clear helps me clean everything up at the end of the day!
If you’re struggling with keeping your desk clear, get some hidden storage spaces to help out. Our monitor stand also doubles as a set of drawers so we can keep paperwork and office supplies in them.
Surround yourself with things that inspire you
It’s hard to sit in one place for eight hours and work the entire time. I like to put little quotes and photos in my workspace that keep me inspired and motivated. Even if you aren’t a visual person, try this out especially if you’ve been struggling with inspiration! Put up photos of past trips that will motivate you to work and save up money for future ones, or artwork that you love.

Getting a grid like the one above allows you to put multiple photos and quotes up. If you’re indecisive like me, this is great because you don’t have to decide between them!
Keep a calendar somewhere near your workspace
I like being able to see a complete picture of the month, so I always have to have a physical calendar. I have my bullet journal that I can write my daily appointments and tasks in, but having a clear view of the month is really helpful.

This calendar is from Target, but if you want to go the cheap and easy route, you can always just find one on the internet and print it out! A physical calendar also keeps me from pulling my phone out so much which helps keep me on task.
Make sure your workspace is comfortable
It took Alex and I way too long to invest in a comfortable chair for the desk, and I’m so glad we finally did last year! We spent $70 on one from Ikea, which isn’t too bad for something you’re going to be sitting in all day. I’ve always liked the option to sit criss-cross in my desk chairs (my form is not ergonomic at all, I know) so it was important for me to have a large, cozy chair.

There’s even enough room in this chair for me to put a shoulder and back massager behind me, and let me tell you how much of a game changer that is. My comfort level has skyrocketed these past few weeks.
Staying inside so much has been difficult, but there are ways to make your space inspiring. I hope these tips help and that you’re doing alright with your work from home endeavor. Let me know on Instagram if you use any of my tips! A lot is changing right now so it’s perfectly normal to feel anything but normal right now. Good luck with setting up your space!
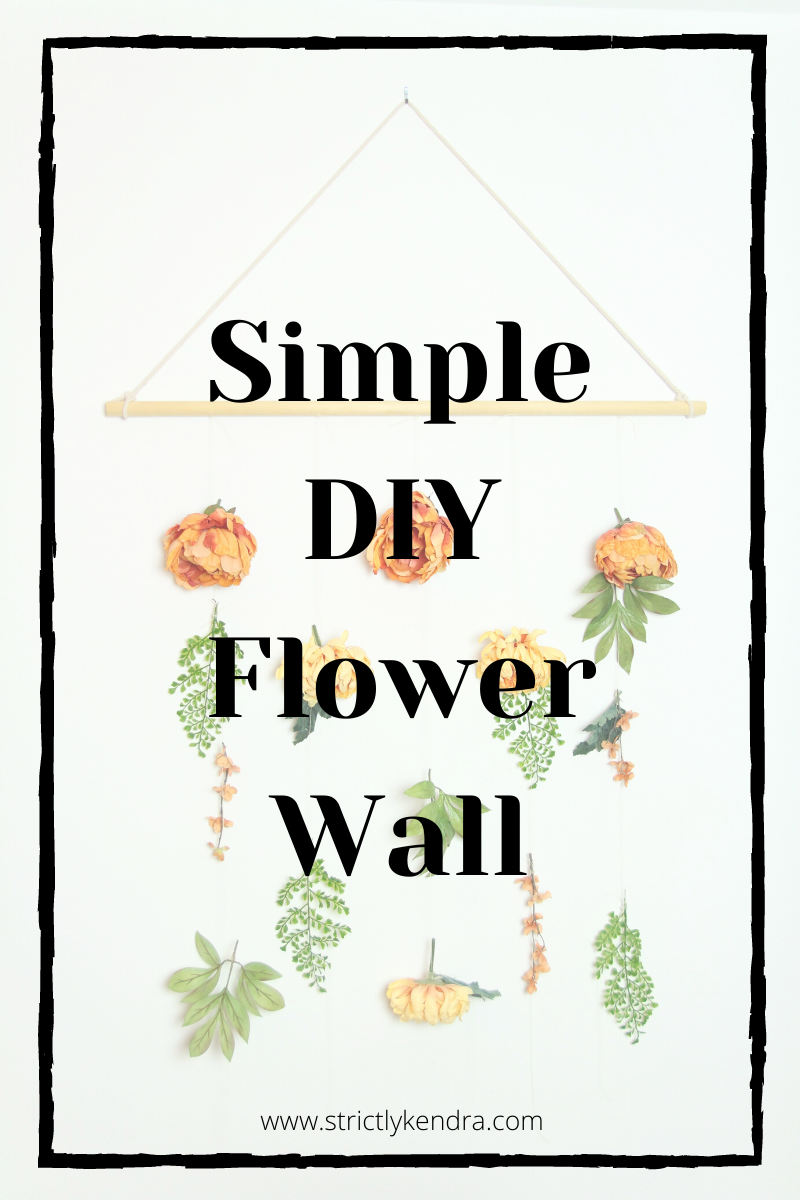
Beautiful flower walls seem to be all over Pinterest. Since I had an empty wall in my apartment, I decided it would be the perfect way to decorate! A lot of the walls look really intricate (and expensive!), so I wanted to do a more simple and cheaper version.

This project didn’t require a lot of supplies, and you probably have a lot hanging around your house anyway! I also made a video of the whole process so you can follow along that way, if that’s easier for you.
Here’s what you’ll need:
- Wooden dowel
- Small rope
- Sand paper
- Hook
- Invisible fishing wire (or beading wire!)
- Hot glue gun
- Fake flowers
Start with sanding the end of the wooden dowel

You definitely don’t have to sand the ends of the dowel if they aren’t dyed, but I liked how it smoothed out the ends and made it look more polished. I got my wooden dowel from Home Depot and the dowel itself didn’t need to be sanded, just the ends.
Tie a large piece of rope to each end of the dowl

We’ll be hanging the flower wall (tapestry?) with this rope so make sure it’s nice and tight. You could enforce the knots with a little bit of hot glue if needed, but mine felt pretty sturdy and have held up for a year now.
Tie five pieces of invisible string to the dowel

Try to space the invisible string out as evenly as possible – this is how we’ll be securing the flowers so you want to make sure they look even. Tying the string was a little tricky since mine was stretchy, so you might have to double or triple knot it.
Space out your flowers and tie them to the string


Tying the flowers on was a little difficult with the string since it’s slightly stretchy, so I made sure to do a couple of knots to make sure it was secure. I also found that it was easier to leave longer “tails” so I could trim them after I was done with the knots.
Hot glue the knots


I wasn’t confident with the knots, so I also hot glued them to make sure they didn’t unravel. You can skip the knot part if you wanted, but the knots made the flowers more moveable.
Add in leaves and other details

I didn’t want to only do flowers for the flower wall, so I also added in leaves and faux ferns. This added a lot of interest to the flower wall and also made it look more realistic. I didn’t want it to just be orange and yellow flowers hanging off of the walls, so I’m really glad I added the leaves in!


Let me know on Instagram if you end up making this flower wall! It’s an easy way to brighten up your home, and it’s also simple and cheap to make. I hope you like how it turned out!
Since graduating college and starting my full time gig almost two years ago, I’ve struggled with finding time to be creative. While I don’t have assignments to do in my spare time, work is exhausting in other ways, and it’s difficult to motivate myself to work on projects.

After a couple of months of this, though, I definitely started to feel the lack of creativity in my life wear on me. I decided to purposefully and mindfully make time for creative tasks. Just by changing up a few things in my routine enabled me to fit in time for creativity, and helped provide an outlet from the stress that comes from a typical 9-5.
Make it easy to get to your DIY supplies
Most of my DIY supplies were put away in boxes under my bed or closet to save space in my apartment. My boyfriend and I re-organized our space about six months ago and I made sure I could easily get to my supplies, which helped tremendously.

I can now see my most used supplies just by walking in my room, and it motivates me to create more. We also got a lot of cool shelving to help organize my supplies, which double as decor. My boyfriend is a huge fan of functionality so it was a good compromise!
Use things like Pinterest or Instagram to stay inspired
I constantly look at Pinterest for new ideas, and it’s great at giving me ideas for projects. Not only can you get inspiration, but you can also learn new techniques. You can have just one board dedicated to projects, or different ones depending on the mediums you like to use.

Instagram is also great for quick inspiration, but it’s not as easy to save ideas for projects. I also look at Etsy or other online stores for inspiration! There’s really no limits with finding inspiration for projects on the internet.
Take classes to learn new creative techniques
I touched on this a little bit earlier, but it can be great to learn with hands-on experience. This is a great way to learn more about different mediums and get inspired by other people! I got my boyfriend a glass blowing class for Christmas (that I joined in on), and it was so cool learning how to work with a completely new material. Especially since it’s not something you work with everyday!

Just search for art classes in your area, and you’ll find tons to choose from. Groupon is also a great website to look at because you can find great deals on there!
There are also a ton of online classes to take, and YouTube is a great resource to learn virtually any creative technique. You don’t have to leave the comfort of your own home to learn new ways to be creative!
Write down new project ideas immediately
I have a bullet journal that I use to keep track of my schedule and also my ideas. Anytime I have a remotely good idea, I write it down so I can come back to it later. Once you start writing ideas down, it’s a lot easier to get the ball rolling. Ideas often come in pairs, trios, or groups, so get them all down on paper!

You can also just keep a running note on your phone if you don’t have a planner, or don’t have it with you. I do this all the time if I’m out without my bullet journal, and just add to it when I get home. If you’re anything like me, it’s really easy to forget ideas, so make sure you have them down somewhere!
Plan time to be creative
I know this doesn’t sound very glamorous, but sometimes you just have to plan the time for projects. Dedicate a certain time of the day, week, or month to being creative! Don’t move that time for anything else, and use it to focus on making something that you love. Once you start to consistently schedule in time to be creative, it quickly becomes a habit.

Planning time for creativity also helps you plan for what you want to do, so you aren’t stuck without the supplies you actually need for a project. I’ve been in that situation and it’s extremely frustrating!
Most importantly…
….stay creative! It sounds like simple advice, but try and be creative as much as possible. Once you start making things, it’s easier to keep the ideas flowing and your motivation up. It’s natural to get into a creative rut, but don’t stay there.
What are your favorite ways to be creative?

Sometimes it’s not always possible to go out and take photos in front of pretty walls or cute cafes for Instagram. Things like weather, time, or sickness (read: the Coronavirus) keep people inside. In all seriousness, it’s really important to stay inside right now and away from populated places. Make sure you are keeping yourself and loved ones safe!
Staying inside doesn’t mean you can’t get great photos for Instagram, though! Take your mind off of what’s going on in the world right now and get creative. Here are some ways to take cute photos for Instagram!

Get creative with angles
Taking photos from above is a great way to switch up your Instagram feed.

Taking photos from above is also really flattering! It’s a great way to switch up your Instagram feed and also make photos at home look great. There are also so many ways to switch up angles! Instead of straight on, try putting the camera lower to the ground looking up at you. Just play around to find what will look good!
Play around with plants
If you have plants (real or fake) try using them for photos! You can look through them, or if you have a cool plant pot try using that too.


I have a giant fiddle leaf fig that was perfect to do some looking-through-the-leaves photos. Originally I wanted only the leaves surrounding my face, but I actually liked my living room wall peaking through.

It’s also fun to use smaller plants to take a cute shot with, too. In this case I used my baby fiddle leaf fig since I love the pot that’s it in. Leafy plants make for really fun photos!
Do a fun makeup look against a blank wall
This is an easy way to get a really dramatic shot and also play around with makeup! I used to do crazy makeup looks when I was younger before I started wearing makeup everyday, so this was so much fun to remember how much I used to enjoy doing this.


I put on a sparkly romper to complete this galaxy look, and taking the photo in from of a blank wall really allowed the makeup to pop.
Try taking a photo behind a window
My photos are technically behind a door, but it’s the same idea. This switches up a traditional headshot and adds a cool layer to photos!


You can also play around with what’s reflected in the photos – the options are endless with the window shots!
Use your favorite nooks to get fun shots
We have bay windows in our bedroom that both Alex and I love to sit in and read or go on our laptops, and also found that photos look really cute there!


Try using different props (or in my case, my dog!) and poses to get a dynamic photo. I also put on my over the top slippers for some different poses and used studio lighting to make everything look more crisp. Chairs can be your best friend for photos since there are so many ways to change up your pose!
Add doodles to your Instagram photos
Since getting my iPad last year, I’ve had lots of fun adding doodles to my photos. It can add interest to blank walls, or pull in a really fun element if you feel like your photo needs it.

This photo was taken in one of my apartment’s courtyards, and I didn’t like how blank and bland everything looked, so I added some flowers to make the wall look more fun! I use Procreate on my iPad to add in doodles, but there are tons of (free!) apps that let you do the same thing. Download them and have some fun with your photos!
Those are some of my favorite ways to get fun Instagram photos all while staying home. If you use any of these, make sure to tag me and let me know! I’d love to see what you create 🙂
Stay safe and make sure to wash your hands!
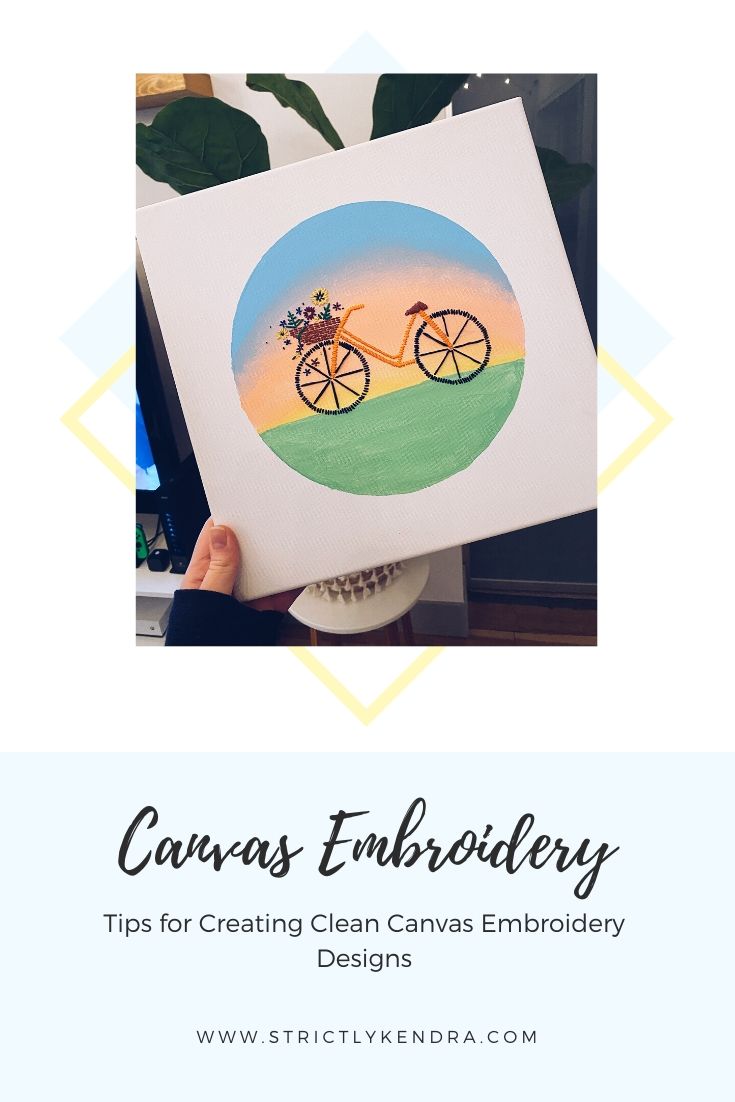
I got into embroidery about two years ago when I made a couple of shirts for Alex and I before a trip to Disney. It’s actually pretty easy to get started with embroidery! The thread is also really cheap and craft stores have so many to choose from.
During a sale at Michael’s, I got about ten of these square canvases. Since I have so many, one day I tried embroidering a canvas and it was similar to using fabric! I love combining the two now because it adds a 3D element to flat paintings. It’s a little more difficult to embroider canvases, so here are some tips!

Watch where you put the embroidery holes
Since canvases are stiff and tearable, it’s important to watch the hole spacing. If you put them too close, it’s possible to make one giant hole or tear the canvas altogether. You can put the holes close together, but when making things like flowers, be extra careful.

Similarly, don’t put multiple threads through one hole. You can do this with fabric, but it puts too much stress on canvas and can cause tears. There’s no flexibility with canvases so you have to get creative sometimes.
Don’t pull too hard
Be mindful of how hard you’re pulling the thread through the canvas. Again, it can easily tear if you handle it too roughly since the canvas isn’t flexible. I’ve definitely pulled too hard before and caused a slight tear or the hole ended up larger than I intended.

Although canvases are sturdy, they’re more delicate than fabric and have to be handled more carefully. Make sure that there are no tangles in the fabric since that can cause you to pull too hard trying to get the thread through. I tend to make my thread too long so tangles inevitably happen and I’ve wasted so much time getting them out!
Sketch your embroidery design first
The great thing about canvases is you can sketch out your design so easily, and erase it if you don’t like it. You can definitely do this with fabric, too, but it’s a lot easier on canvas. Take advantage of this! Even if there’s already paint on the canvas, it’s super easy to lightly sketch over the top.

I’ve tried freehand embroidery on canvases before and it doesn’t turn out as well if I’m following sketches. I like to figure out the spacing, like with the bike video above, and it tends to look messy. The only things I freehand are small details, like flowers and polka dots.
Try not to back out of the embroidery holes
With fabric, you can easily back the needle out and make a different hole. You can’t do this with canvases since it’s rigid and the canvas won’t “go back” into its original form. Once that hole is made, you have to stick to it unfortunately.

If you absolutely must move the hole, you can try to “pat” the canvas back into place, and even put some paint over it to try and hide the mistake. You can also place the hole where the embroidery thread will cover up the mistaken hole. There are ways to cover up mistaken holes, but it’s harder than regular fabric embroidery.
Good luck!
Canvas embroidery is so much fun and you can produce beautiful results. Over time, your lines will get cleaner and your embroidery will be spaced out well. Search Pinterest to find design ideas, and embroider away!

Dear Senior Year,
How do I even start this letter off? I went through so much this past school year, and you really taught me a lot, Senior Year. I finished up my degree in International studies with minors in English and European Studies and it felt like the busiest year yet. Not only was I finishing my classes, but I also had to figure out where to live after graduating and find a job when my status of “student” would no longer be accurate.
Senior Year, I hated you and loved you all at once. I hated that you were difficult and demanding and put me through so much, but I also love you for it because I grew so much as a person. I loved that you reaffirmed my belief that it would all be okay in the end if I tried my hardest and kept my eyes set on my goals, and that you provided the time for me to travel a little bit and see the people I love the most.
It’s insane how different you were from my senior year of high school. I thought I would feel similar to how I did four years ago – excited to be done with school and ready to start my new adventure. There were many nights full of tears, however. Tears about all the unknowns in my life, and tears for all of the comforts of being a student I would be leaving behind. I didn’t realize how much I love school and learning, or how upset I’d be leaving it behind (for now). It’s scary leaping out into a world that’s so unfamiliar. The “real world” some call it, but I kind of hate it when people say that.
Nothing about college hasn’t been “real” and I feel that name discredits all the hard work students put into their studies, jobs, clubs, or anything else they do. All of those things count in the post-school world, but people seem to think that it’s all child’s play or that it isn’t really hard work. It is, and students have to balance a lot. That’s not to say you don’t have to balance a lot when it comes time to starting your career, but Senior Year, you taught me to value my experience of being a student and all that comes with it.
Life post-college will be about growth and figuring out further who I am. It’s filled with a lot of uncertainty but also a lot of excitement now that I’ve gone through graduation, and that I’ve mourned the loss of you, Senior Year. You came and went much too quickly, and it left me with whiplash. I frantically tried to enjoy the year while balancing everything else in my life, and was desperate to feel like I didn’t miss out on anything. Through all of that, you showed me who my real friends are, and aren’t. It stung, but I realized that not all relationships are healthy or worth the time and effort I could be spending on the ones that are healthy and fulfilling. This made me happier in the end, and I’ve learned even more about myself.
College started with me moving to a place where I knew no one, and it’s ending with me having found a community I love. People were brought into my life that I had no idea about before, and now they’ve become the largest parts in it, and I couldn’t be more grateful to have them. Senior Year, I’ll never forget all the trials, lessons, or rewards you brought into my life. I hope that the future is filled with even more, and I know I’m even better prepared for it because of you.
Love,
Kendra